Follow these steps below to generate the LCZ classification using the SAGA GIS software:
- Open the SAGA GIS software by clicking on the saga_gui.exe file.
- Load the files that you unzipped in the previous steps, which contain the features for classification: File -> Grid -> load -> navigate to feature folder and select all.
- Run the Local Climate Zone Classification tool under Geoprocessing -> Imagery-> Classification.
- Define the following parameters:
- Select the Grid System of your features (only available).
- Add all Feature grids = Landsat data. Click in ‘no objects’ and then ‘…’ at the right side of the box.
- Select your KMZ file from Part 1 as Training Areas.
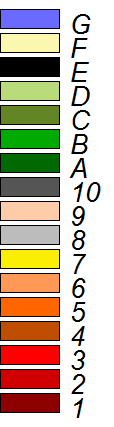
- The Class Definition File defines the color-map for the output. It can be downloaded here.
- Save LCZC as … specifies the path to save the classification output as KMZ, to evaluate it in Google Earth again.
- Expert option: If you set LCZC (Filtered) to create, additionally a post classification Majority filter is applied. You can then specify a KMZ output file for the filtered version as well as the radius for the filtering in pixels (note: the larger the number of pixels, the more homogenous the classification will be).
- Once the classifications have been generated, save the project since the classification has only been saved as a KMZ file and not in SAGA format. To do this, click on File-> Save Project.

Local Climate Zone Classification in SAGA
- Next, open the newly created KMZ file in Google Earth and validate the accuracy of the classification. If large areas of the urban landscape were incorrectly classified, please add further training areas in Google Earth and repeat the classification until a satisfactory result is achieved.